
This tutorial will help you understand everything about the LinearLayout and makes it easier for you to create different views using this Layout. The LinearLayout is a layout based on the idea of a box, that is to say, buttons or other widgets belonging to this Layout are either aligned in a horizontal or a vertical line.
How to configure my LinearLayout?
You can play with many different parameters/attributes available to customize this layout .
1. Orientation of the Layout
This is the first thing that you specify when you create your LinearLayout is android: orientation. This option specifies how you will align the elements in the Layout.
Two options are available:
- Vertical : All items are aligned on a vertical line.
- Horizontal : All items are aligned on a horizontal line.
2. Size of element
The LinearLayout and all the widgets/buttons, of which its is composed, must be given a size (height and width). So they must be set using the following two properties:
- android: layout_width
- android: layout_height
These two properties can have 3 different types of values:
- A fixed size, eg 50px (pixels). So whatever the size of the screen, the item will occupy exactly 50px.
- fill_parent : We ask a widget/button to occupy all available space in its parent container (after the placement of other widgets).
- wrap_content : This command asks the Widget to occupy its natural size depending upon its content, for example, in case of a button its text determines its size. Hence, the button will occupy as much space as required by the text in it, without cutting the text.
3. Gravity in Layout
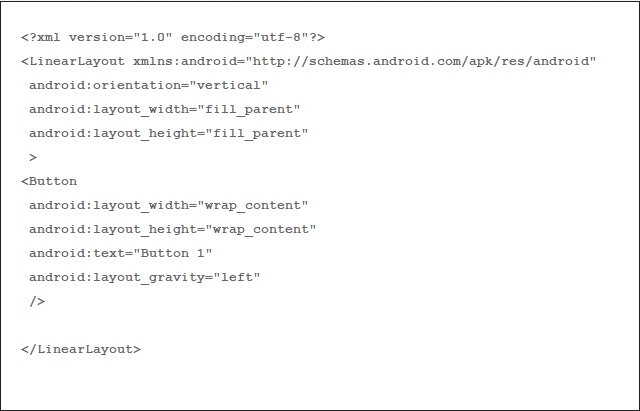
In a LinearLayout, elements are aligned from left to right and from top to bottom. So the question that arises is how to do if we want to place our element at the bottom or right. The answer lies in the parameter gravity (android: layout_gravity).
The most commonly used gravities are left, center_horizontal, top, bottom, and right to align elements left, center, top, bottom and right, respectively.
You can also use center_vertical to vertically center the element.
Here is an small example, we have changed the layout xml file:
- Left alignment
Here is the result:

- center

and here is the result
You can do the same for the rest

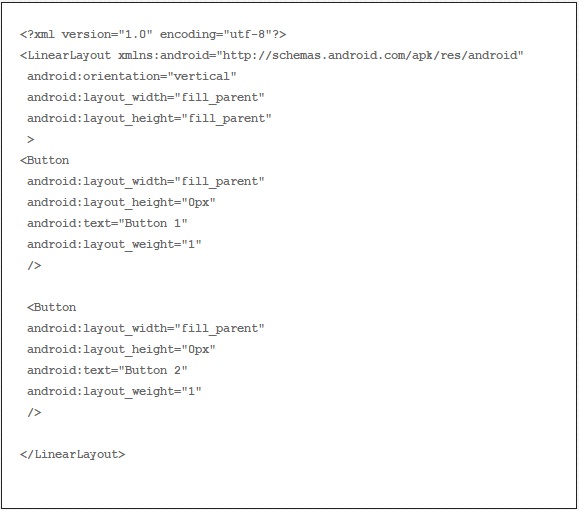
4. Weight of the elements
You may wonder what is meant by the weight of an item. Take an example, imagine you have two buttons in a column, and you want them to occupy all available space.
If they are assigned the same weight ( android: layout_weight ), free space will be shared equally between the two. If you given weight of 1 to the first and 2 to the second, the second will take twice as much free space as the first (default weight value being 0).
You can also use percentages, but in that case you will have to make sure that the percentages do not exceed 100%.
This small example will explain everything:
- If the weights are set as same
and here is the result

- Different weights case

and here is the result

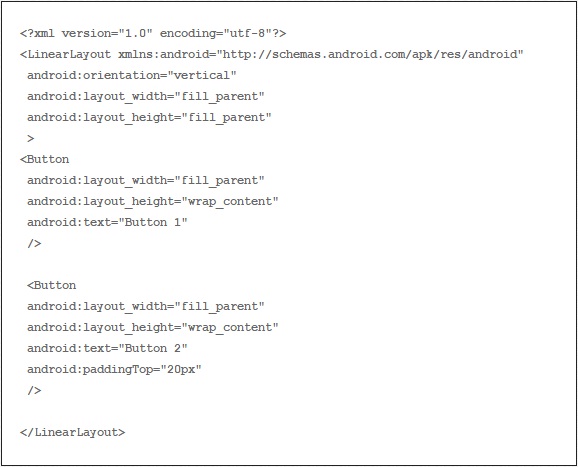
5. Padding
The various elements that you create, are by default are arranged tightly close to each other. For example, if you create two buttons they will be arranged close to one another. While for each individual button, the text in it will be close to the border of the button. You can increase this internal spacng between button border and text using the padding property android: padding (padding top, left, right and bottom ).
It precisely defines the space between the edge of widget (button in this case) and its content.
Here is a small example:
and here is the result:
You notice that the button “2” has a small gap between its title text and its top. This spacing is achieved through the line android: paddingTop = “20px” .

Now we will see what is the different between padding and margin. Returning to our example and we will replace paddingTop by marginTop (android: layout_marginTop = “20px”) and observe the result:
Note that finally the padding is an internal spacing element while at the margin is a space external to the element. That article ends here, hoping that you understood everything on the LinearLayout.
